Detailed procedure for removing a flywheel on a VAZ 2110 car, troubleshooting it (identifying defects and eliminating them if possible) and reinstalling it.

Over the course of a significant mileage of our car, clutch problems begin, it deteriorates. Usually the flywheel does not require replacement up to 200-300 thousand kilometers of the car's mileage and even more, but if it starts to fail after 50 or 100 thousand km, then you need to look for the reason for its rapid wear (this can be a harsh ride, weather conditions or adhesion defects that should be repaired). The procedure for replacing the flywheel itself is not complicated, but it requires a certain amount of time, because because of this part, you will have to dismantle the gearbox and disassemble the clutch (read about repairing the clutch on VAZ cars).
Flywheel removal and troubleshooting:
1. Before starting work, remove the battery (see the article on how to remove the gearbox) from the car, drain the oil from the gearbox and remove the starter.
2. Remove the transmission and disassemble the clutch.

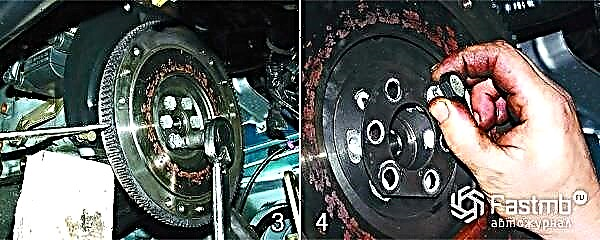
3. Now that you have reached the flywheel, remove the six bolts securing it. But to do this, put back one bolt of the gearbox mounting and insert a screwdriver with one hand into the teeth of the flywheel so that it does not rotate while unscrewing the bolts.
4. While holding the flywheel with one hand, remove the bolt retaining plate with the final bolt with the other.

5. Now carefully remove the flywheel from the crankshaft flange.
6. Next, you can proceed to the inspection (troubleshooting) of the flywheel and first of all inspect the teeth of the steel disc. If they have gross risks and other damage, then the flywheel should be replaced with a new one.

7. If everything is in order with the rim of the teeth, then switch your gaze to the adjacent surface of the driven disc, it should not have deep abrasions and other defects. 8. Also, carry out a similar troubleshooting on the back of the driven disk, or rather, look at the often adjacent crankshaft flange.
If such distortions are visible in 7 or 8 points, then the flywheel must be replaced with a new one or repaired - polished on special equipment in a car workshop.

9. To make an accurate check or repair of the clutch disc, go with it to a car workshop where the required equipment is available. Actions and recommendations for flywheel repair:
- Troubleshooting of the adjoining surface of the clutch disc (3) should not be more than 0.06 mm.
- The non-parallelism of the upper surface of the clutch plate and the lower (2) for attaching the clutch should not be more than 0.1 mm.
- On the planes of the clutch disc (1 and 3), the runout should not be more than 0.1 mm.
- When cleaning the surface of the flywheel (3) from abrasions and scratches, you should know that the maximum possible removal of a metal layer is not more than 1 mm.
- Simultaneously with side (3), surface (2) should also be sanded. To do this, observe a step between them with a height of 0.5 ± 0.1 mm. When grooving, observe the parallelism of the adjacent surfaces (1 and 3).
10. As with cleaning the surface of the flywheel finish, proceed to reinstall it. First of all, degrease the bolts and threaded holes for them, and then apply sealant to their threads. Mount the part back in the order of removal, only align correctly the holes on the crankshaft flange and flywheel (they are located asymmetrically).